When it comes to taping your hockey stick, most people wonder how much blade the tape should cover, where to start from and how much should the strands overlap?
Having played the game now for 30+ years, my method is based on how best I can protect my blade from damage.
I play center in two beer leagues during the week and need my sticks to last as long as possible.
Take note that I usually buy the expensive composite sticks, most notably from CCM (Trigger/Tacks models). This is not to impress anybody, but only because I am accustomed to extremely lightweight sticks.
And since these sticks cost a pretty penny, I’d rather prolong their lifespan as much as possible.
While sticks typically break at the shaft level, the blade can incur a fair amount of damage as well.
In addition, taking faceoffs as a centreman will also cut into the overall longevity.
That’s because I’m fighting the opposing player to win back the puck.
These battles include hacking at the other player’s stick, shifting weight on the blade to scoop the puck back and so on.
Generally speaking, most other players tape their stick in a particular way for stickhandling, shooting on net or passing the puck.
That said, let me explain away what I consider to be the perfect way of taping my hockey stick.
Steps for Taping your Hockey Stick (The Perfect Way)
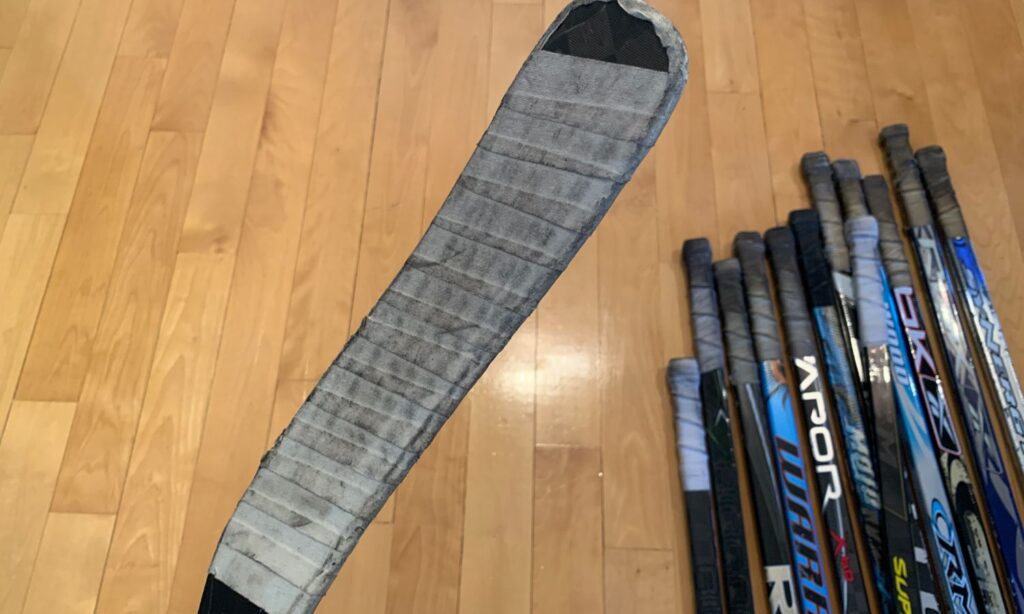
STEP 1 – Add protective layer of tape to the toe blade
Cut up a 6-inch (15cm) strand of tape. Split this strand into two thinner and equal spaghetti strands.
Wrap the first strand from the top edge towards the bottom edge of the toe, along the thin segment of the blade.
You can start from about 1.5-2 inches (4-5cm) from the toe and wrap it underneath, completing the C-shape. Stick the excess tape on the back and front faces of the stick.
This will protect the toe blade of the stick from chipping off during use, extending the overall lifetime of the blade.


STEP 2 – Tape the blade of the stick starting from the heel
I like to start taping from the heel just above where the blade meets the shaft (1-strand in width).
Make sure to go over the top of the blade when wrapping strands from front to back.
This way if the exposed strand loses its adhesiveness, it will not hang from the bottom of the blade. You can also rip off the unglued portion if it’s bothersome.
With this in mind, make sure that the final wraparound finishes on the backhand of the blade.
The last 2-3 wraparounds should overlap with the C-shaped tape protecting the toe blade.
Lastly, each loop should overlap the previous loop by about a quarter inch (or 0.5cm). You want to avoid gaps between loops to maintain good control of the puck.


TAPING THE HANDLE/UPPER SHAFT
Typically, taping the handle of the stick is a one-and-done deal.
The tape will never wear off before your stick breaks. Unless it’s been sitting in the garage for years on-end, collecting dust and cob webs.
That said, I go through a standard ritual with each stick.
There are 3 parts to consider: the tape bulge at the butt-end, the grip spiral and the length down the shaft.

The bulge is to prevent your upper hand from slipping off the stick.
The grip spiral is to keep your hand steady and finally, the length is necessary to cover the entire glove width.
For the first time ever, I measure the length of tape from the stick plug down the shaft, and it came out to 7 inches (18cm).
With all this mind, let’s explain the taping process. Note that I complete the process without having to rip the tape at any point until the end.
Starting at 6.5 - 7 (16.5-18cm) inches from the top, wrap twice around the shaft opposite to where your fingers point while gripping the stick (image 1 below).
Once done, twirl the tape like a spaghetti strand. Don’t overdo in length, as you can spin more along the way.
Make sure the grip is going in a downward spiral and add 4 twirls up to 1.25 inches from the top (image 2).
Once you’ve completed the twirls, proceed with flattening the tape to create your butt-end stub.
The thickness is up to you, but I cover about 1/8-inch so that my glove won’t ever slide off (image 3).
Once you’re done with the stub, proceed to cover the exposed spirals with one layer of tape.
When you reach back the point of origin down along the shaft, rip off the end and it’s done (image 4).


Downsides to a full-blade tape job
Slushy ice is a tape job’s worst enemy. So, the more the ice is roughed up over the course of the game, the harder it is to handle the puck.
This applies to passing, shooting and especially stick handling.
The slush is not only absorbed onto the tape but can accumulate at the bottom edge of the blade.
Solution to slushy stick blades
To counter the problems caused by slushy ice, you can wax the palette of the blade both front and back.
Hockey wax is available for sale online, or you can also use a candle stick for a quick fix.
In case you have neither, you can rub the edge of a puck against the blade instead.
I like to coat both sides of the blade, except for the first 2.5 inches (6.3cm) from the heel on the front side. This is a personal preference as I like to practice the lacrosse move during warm-up.
I’ve never used the play in a game before, but I still like to think of it as an option in my repertoire.
Or maybe I’ll just leave it to Andrei Svechnikov (see Youtube video here) to use it in an actual game that counts.
The reason for leaving out that spot on the wax job is because the puck would just slip away on the lacrosse play attempt.
For me, I apply pressure in that exact spot while making sure the puck stays in place. I've seen other players scoop it up either at the midpoint of the palette or on the backhand.

How often should you change the tape on your hockey stick?
I change the tape on my stick every 2 games on average. Occasionally, if there are no rips, holes or loss of adhesiveness on the tape, I’ll keep it a third game.
But, beyond that it becomes annoying to remove.
Depending on the quality of the tape itself, I'm left with clumps during removal. If anything, stick with Renfrew hockey tape – they offer a quality product.
Those clumps make the next tape job beyond frustrating, because I’m fighting with the old tape to make way for the new.
Ideally, you want to remove the tape in one fell swoop. That’s best done after a game or two of use.
That said, the best time to tape a stick is a couple of hours before game time. Most people do it right before or after the game.
Just before the game, I encounter issues with tape adhesiveness, which is why I tape front to back going over the top of the blade.
When those strands come loose, I can rip them off from the back rather than feel like I’m dragging around confetti the rest of the game.
When I tape my stick way ahead of time, I come across issues with the tape ripping off to easily.
Maybe it’s the way I play, but these are some of the issues I notice from my tape job.
White or black stick tape?
When I was younger, one of my friend’s father suggested to use black tape on the blade palette. His theory was that black tape camouflages the puck since they both match in shade.
It’s an interesting theory, but I doubt it ever benefited my game.
So, for me, there’s no advantage going with white or black tape.
In any case, there are things you may observe with the white tape, considering it usually contrast with the dark color of the blade.
The white tape allows you to better observe any wear and tear. In addition, I tend to wax my stick with the puck, and I like to see the black markings on the blade.
Other than that, there’s no quality difference between the two.
So, go with the shade that appeals to you the most. Heck, you can even choose amongst various colors: blue, green, pink and more.
Final Thoughts
You’ll find many ways to tape up your stick. Some players like to wrap up the toe of the blade only, while others prefer to tape the middle area.
There are also players who don’t care about the loose strands – which personally, drives me crazy.
If you like to tape up your stick in any of these other ways, go right ahead. Whatever you feel gives you an edge in your game.
The takeaway from my technique should be: no annoying loose strands, protect the blade toe and wax your blade to avoid water absorption on the tape.
Finally, make sure to overlap the strands as best you can. Because when you leave the blade exposed, it is susceptible to damage.
Players can step on the blade, hack at it and so on.
If you can't stand when your stick breaks like me, these tips will serve you well.
On average, my sticks last me a full season or two. Reminder, I play ice hockey twice a week during the winter and once a week in the summer.

")
")
")
")
